Gray wolf to draw in stages. Learn to draw a wolf with a pencil step by step
Good afternoon! Let's try to draw a traditional inhabitant of deep forests - a wolf. We tried to make it not cartoony, but close to reality. That is, of course, we didn’t draw all the wool and didn’t really work with chiaroscuro. But we tried to make it formidable and harsh. We hope that we succeeded, and we also hope that you succeed too. So, let's start the lesson on how to draw a wolf.
Step 1
Let's first outline the contours of the body of our wolf. First draw the circles that form the head (one circle) and torso (two circles, the front one is larger). Then connect the head with the first ball of the body, and the first ball of the body with the second with the usual smooth line. From the second ball of the body, draw a broken line - the tail. Then outline the limbs. At the end of the step, draw a cone on the head ball, as in our sample.

Step 2
Now there will be quite a lot of work, but in the next steps everything will be easier. Now let's start with the head. With a longitudinal line, mark the muzzle into two halves (as you can see, it is shifted to the left). Let's outline a pair of ears with borders on one side.
Then connect the ball of the head with the first (and largest) ball of the body. The connection is represented by two lines, it forms a large and powerful neck.
After that, you should connect the large and small balls of the body together. The resulting figure should taper slightly backwards.
The final step is working with paws. The forelegs and hind legs are different in shape - naturally, you saw this strong bend on the hind legs, despite the fact that the front ones are straight. But, despite this, the front and hind legs have one very similar feature - they taper equally smoothly downwards in their lower part.

Step 3
Well, that's all, went very short steps. Let's draw small, menacing eyes. They are fairly close set (focus on the vertical line of the muzzle). Also note that the eyes are angled, giving them a frowning and aggressive look.

Step 4
Now let's outline the muzzle with jagged contours, as in our drawing. Draw the neck with the same contours. Important point- the neck should not be outlined strictly along the line from the second step, but a little more voluminously.

Step 5
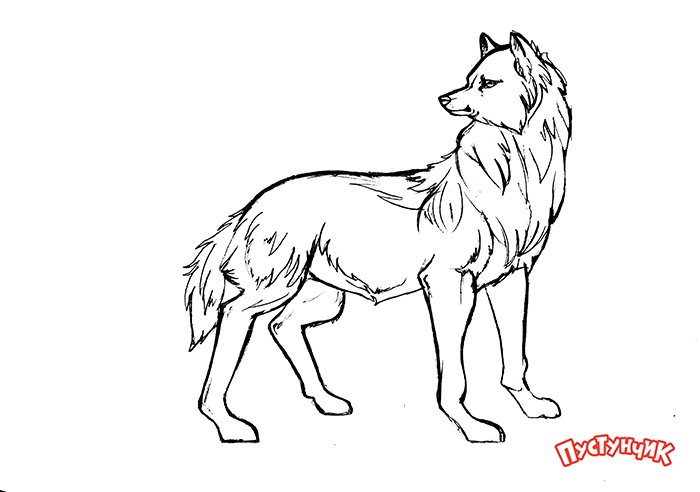
Let's repeat the same step, only now it will not be the neck, but the front part of the body and the front paws. The serrated contours here will be visible on the belly, slightly on the nape, and also at the base of the paw. Yes, well, and about the claws, of course, do not forget.

Step 6
As you probably already guessed, we are next in line for the back of the body, hind legs and tail. We edging in the same way, selectively applying jagged contours. Here you can see them on the tail, and mainly on the top of the paws.

Can you draw a wolf? Not? But your child asks you about it, and you don’t want to lose face in front of him at all? Or, perhaps, you were instructed to make something similar for a matinee in kindergarten, but you have no idea how to draw a wolf? But you never know what other reasons why you wanted to depict this dangerous forest animal on a piece of paper!
Well, do not rush to get upset. This master class will teach even the most "lost" artist, and the question of how to draw a wolf will no longer lead you into bewilderment and stupor.
So, you will need:
- blank sheet of paper;
- quality eraser;
- the main tool for creativity is a pencil, it should preferably be soft or medium hard;
- positive attitude and self-confidence.
Have you prepared everything? So, it's time to show in detail how to draw a wolf with a pencil in stages.
First stage. We designate the body of a forest predator
Draw an elongated bean-like oval, the left side of which will be slightly larger than the right. Make sure you are using regular pencil for a blueprint. This is important because you will later need to erase some details to make the drawing neat.
Look at your original creation. Agree, now the task of how to draw a wolf with a pencil does not seem so difficult to you. Even a schoolboy can handle it. Take a deep breath, continue.
Second phase. Adding Joints and Head to the Animal Sketch
Imagine this predator, or even better, find its corresponding photo, print it out and put it in front of you. In this tutorial, we will assume that the head of a dangerous animal is on the left, and the wolf is standing sideways on all four legs.

Add sketches of the head and joints in the form of the simplest circles. First draw a circle at the left end on top of the original oval. He will become the head of a wolf in the future. For the back joints, draw two intersecting ovals (almost circles). The one to the left should be smaller, as in the future it will be the back of the leg, which is not visible. Under the muzzle, in the chest area, you need to add a slightly elongated circle for the front legs.
From the side it seems that it turned out to be a children's kalyaka-malyaka. But you will soon see for yourself: with the help of simple steps such a seemingly difficult task (how to draw a wolf) for a person far from visual arts becomes clear and simple.
Third stage. Adding the Neck and Ears to the Predator
With the help of this master class, you yourself can proudly show your child how to draw a wolf in stages.

And now it's time to start creating the neck and ears of the predator. Draw two sharp corners on the top of the head. The wolf does not have very large ears, unlike, for example, the fox, so do not overdo it.
To create the neck (or more properly called the scruff), simply draw two slightly curved lines connecting the head to the torso.
Fourth stage. Add a muzzle, eyes and paws
In this part of the master class, you will learn how to draw a wolf face.

To do this, on the head in the lower part, approximately in the middle, add a line similar to the letter U. For the eyes, simply draw two small drop-shaped slanting ovals small size.
And now add two hind legs. We start by drawing curved lines from the joints. They should be bent outward towards the tail of the wolf. From below, immediately add small stops.
For the front paws, the lines should be almost straight, like an L in mirror image. The front leg of our predator is fully visible. And the second paw (the one in the background) is hidden, and only a small part of it will be visible.
Fifth stage. Adding a Tail and Nose to the Animal
At this stage of the master class, you will learn how to draw a tail for a predator. Let's make it almost invisible, hiding behind its hind legs. To do this, draw a convex line from the most distant part of the body to the leg.

On the face of the wolf, at the bottom of the previously drawn U-shaped muzzle, draw a circle in the middle. This will be the predator's nose.
Congratulations! The main details of the drawing are ready! And now, to give the wolf naturalness and liveliness, outline the head, torso, ears and tail of the animal with zigzag lines.
Sixth stage. Erase extra lines and add details
At this stage, it is necessary to erase the already unnecessary pencil sketches of the animal's joints. Now you can add details such as the lower jaw and claws.

To draw the fur of a predator, add a few additional zigzag lines on the body, especially in the nape area. Also on the feet of the wolf it is necessary to mark the fingers.
Look at your work! Now the question of how to draw a wolf does not seem so difficult to you? Truth? Not having art education, you were able to do it, and now a beautiful forest animal is looking at you from a sheet of paper!
Seventh stage. Coloring the Predator
So you learned with the help of this article about how to draw a wolf with a pencil in stages. Everything is ready, now you need to give the animal color.

Depending on the breed and habitat, wolves can be completely different shades: gray, brown, beige or even white. Color can be added with pencils or paints. For simple option watercolor is best. With its help, it is much easier to blur the lines in the right places, decorating somewhere darker or lighter than the main tone.
Now you own the easiest and surest way and know how to draw a wolf. Step by step, from the smallest parts to the largest, from simple to complex details, you created a sketch of a forest predator. And now you yourself are surprised at how beautiful your beast turned out to be!
A funny merry fellow from “Well, wait a minute!”, An evil predator from “Three Little Pigs” or a fool from a folk tale about a fox-sister - in whatever form the wolf stands in front of us, thanks to bright features character, he immediately becomes the object of close attention, and often - and everyone's favorite. Let's learn how to draw this handsome man?
Do you prefer video tutorials? Then this video is especially for you. The tutorial video will show you how to draw a wolf howling at the moon.
How to draw a portrait of a wolf with a pencil step by step
1. Before starting work, consider the location of the portrait on paper. Draw a circle for the head just above the middle of the paper, leaving room for the neck at the bottom. The circle is divided by two auxiliary lines: the middle line of the head and the line of the eyes. These lines will help you navigate further drawing.
The middle line of the drawing - this is the guideline that all artists use. It helps to make it easier to navigate on paper, as well as to make the image symmetrical and even. Therefore, it is called the middle or central.
Important! At the first stages, do not press hard on the pencil, because all the symbols are auxiliary, and they will need to be erased at the end.
2. Let's move on to detailing the silhouette of the head. Draw the characteristic shape of a wolf's head, slightly narrowed at the top. On the sides, mark the placement of the ears (without detailing). And in the middle, draw an elongated cavity and a pear-shaped nose, as shown in the figure. At this stage, also draw in more detail the nose and mouth of the wolf.

3. Draw the eyes of the wolf. Place them above the line of the eyes at the same distance from the center line. The wolf's eye is shaped like a seed.
Also at this stage, we detail the ears and denote the growth of hair on the silhouette of the head, as shown in the figure.

4. The head of the wolf is ready. Feel free to wipe all auxiliary lines.
At this stage, draw the neck, covered with thick hair. Lightly mark the hair growth on the neck and head. These marks will allow us to better navigate when we start hatching the wolf.
Draw the fur on the ears and move on to the next step.

5. Now let's move on to tinting the image with a simple pencil. To begin with, I shade the dark places and the most important parts of the portrait of the wolf, namely: the nose, mouth and eyes. Then I begin to hatch the head from the ears, at each stage smoothly moving down.

It's important to know! The stroke should be set according to the shape of the hair growth, so the hair will come out realistic. Do not forget that wool cannot be monophonic. There are light and dark places. Alternate them, as shown in the photo, and Your wolf will become like a real one.
6. With each step, move lower and lower, shading first one part of the head, and then the other. Do not forget about hair growth and gradation of shadows, partial shadows and highlights. Add contrast to the work: shade dark places more strongly, light places lightly.

7. Congratulations! The drawing of the wolf is ready.

Learning to draw a wolf walking in a forest clearing
1. First you need to think about the placement of the wolf figure on paper. To do this, we inscribe it in an auxiliary rectangle. The rectangle will allow us to better navigate on paper and not shift the composition in the wrong direction.

Interesting. To determine what size the rectangle should be, mark the bottom and top ends of the wolf, as well as the side ends. By connecting the marks with lines, you will get a frame that you cannot go beyond, and which will be your guide during the entire drawing process. Try!
Important! At the first stages, do not press hard on the pencil, because all the designations are auxiliary, and they will need to be erased at the end.
2. Now let's move on to the drawing itself. In a rectangle, using geometric shapes, conditionally depict the body of a wolf. I chose ovals. First, we designate the oval of the head, then we outline the ovals in place of the future ears and nose. We do the same with the body and limbs. Finally, mark the placement of the tail with an oval.
It turned out to be something like an inflatable toy, right?

3. And now we can begin the detailed drawing of the body and head of the wolf. We first draw the silhouette of the head and neck: ears characteristic of a wolf and an elongated head, similar to the head of a dog. On the neck we denote the growth of wool, but so far without details.

Now we move on to drawing the body and limbs, conveying the characteristic shape and adding plasticity to the lines. Finally, draw the tail.


4. If the silhouette of the wolf is ready, you can detail the image. But first, erase all the auxiliary lines with an eraser so that they do not prevent you from drawing further.
At this stage, we will depict the facial features of the wolf - draw an eye, nose and mouth. After that, draw the wool, which will indicate the end of the head. At this stage, we detail the ears by drawing strands of wool near them.

5. Draw strands of wool falling down on the neck.


6. And now draw the hair on the whole body and tail, as shown in the figure, and only a little on the limbs.
7. The wolf is almost ready! It remains only to draw the paws in more detail, and you can move on to the background. Draw mountains and fir trees in the background to show that the wolf is walking in a forest clearing.

8. Congratulations! The composition is ready. It remains to color it with colored pencils or paints.

How to draw a wolf silhouette step by step
The silhouette technique is interesting because it is very simple and fast in execution, but it creates incredible visual effects. Now we will try to draw a wolf in a graphic technique silhouette.
1. First, consider placing the silhouette on paper - let it start a little higher than the middle of the sheet. Then, with ovals, designate the ears, head and neck of the future silhouette of the wolf.

Important. At the first stages, do not press hard on the pencil, because all the designations are auxiliary, and at the end they will need to be erased.
2. Based on the resulting design, draw in more detail the contours of the body of the wolf. Draw the characteristic ears, the shape of the head and neck, as shown in the picture. Don't forget to draw some fur on the outlines.

3. The silhouette is ready! Now you can cover it with black ink or gouache and leave it to dry completely. But I decided to make the drawing a little more interesting, so I divided the resulting silhouette into planes of various shapes, leaving a distance of a few millimeters between them.

4. I paint over the resulting planes with black ink. I leave the distances between the planes white.

I hope you enjoyed drawing the wolf in different ways. But if you prefer video instructions, the next video is especially for you. The instructional video will tell how to draw a wolf howling at the moon:
Do not be afraid to fantasize and use new techniques. Success in creative work!
This tutorial will detail, how to draw a howling wolf pencil step by step. step by step pictures wolf with detailed recommendations will make the drawing process simple and understandable. To make the task even easier, I will break the drawing into two large steps:
- Head Drawing - Here you will learn how to draw the muzzle, ears and neck of a wolf.
- Drawing the body - in this step we will deal with drawing the whole body of the wolf.
Stage 1
We will start drawing from the head of the wolf. We need to draw his face and ears. Let's get started.
Step 1
First of all, we need a basis for drawing. If you remember what the wolf's head looks like in profile, then you can understand that it consists of two parts - the oval part of the head and the elongated part of the muzzle. That is why for the base we need to draw the following figure.
Step 2
As you can see, the bottom line is a little shorter than the top one. We connect these lines so that there are no hard transitions, and the corners are soft. Almost at the very end of the oval, we begin to draw the ears of the wolf - one of them, which is closer to us, is visible completely, and the second is mostly hidden.

Step 3
Now let's draw the face of the wolf. We limit the tip of the muzzle with a line, this will be the nose, we divide the middle of the elongated part - since the wolf howls, his mouth should be slightly ajar. Also do not forget to draw the eyes of the wolf.

Step 4
It's time to draw a wide neck. We do not draw it smooth, as our wolf is covered with gray hair. The neck needs to be drawn in the form of fur directed down.

Step 5
It is necessary to give the ears of the wolf "fluffiness", that is, we add individual elements, as shown below. All extra lines must be erased in the process of drawing.

Stage 2
So, we figured out the drawing of the head and muzzle of the wolf, now you can proceed to the equally difficult part, that is, the body.
Step 1
As always, in drawing complex objects, we start with simple forms. We need to draw something like this - the body of a sitting wolf tapers towards the neck, and towards the bottom we see a significant distance between the paws.

Step 2
Now we start to flesh out the shape, I will work with the chest and front paws. Focusing on the initial contours, draw the fur on the chest and the lines of the paws. At the ends of the paws I add claws.

Step 3
Let's move on to the next part. We start from the back, draw a slight bend there. Add lines of paws and fur on the belly of the wolf. Be sure to draw a tail.

In this lesson we will learn how to draw a wolf with a pencil step by step.
The lessdraw website has a whole section on drawing wolves. There you can find tutorials like:
In this lesson, it will be shown how to draw an ordinary wolf completely, in full height. Let's start the drawing process.
To make it easier to draw, you need a base. We draw even circle and connect it with a shape that looks like a droplet.
To the front and back of the droplet, we draw lines of such a shape - these will be the paws of the drawn wolf.

In the upper part of the main circle of the head, draw the ears. You can immediately start drawing them or just draw two conditional triangles, so that later you can draw the wool in more detail and so on.

In front, slightly protruding beyond the boundaries of the circle, you should draw the base of the muzzle, nose and mouth of the wolf.

We connect the head with the body of the wolf, also on the muzzle you need to draw his eyes.


We give shape to the belly and back of the torso of the wolf.

We draw the near thigh of the hind leg.

Erase the extra lines again. Now you can draw the far thigh and the hind legs themselves. Please note that they are slightly different from the front ones.

We remove all the lines of the sketch and draw the tail.


