Do-it-yourself art paintings at home. Paintings for the interior: a unique design with your own hands
In an age when all design solutions already seem boring and a little fed up, making a picture on the wall with your own hands means finding an opportunity to stun your guests and make them admiringly look at the creation of a talented owner. However, experts insist that even talent is not strictly required, because the main thing is desire. Everyone has the right to a zest in the interior, and the fact that you can make it yourself allows you to save a lot - it’s even strange that this technique has not yet become universally popular.
The idea of placing pictures on the walls is attractive enough to play with an interested person. bad joke. The owner of the premises, having heard about the unique opportunity to quickly, inexpensively and creatively decorate his home, can take rash steps - for example, make pictures inaccurately or use the first idea that comes across instead of the one that would turn out to be ideal.
You can't do that. Failure in this matter can greatly disappoint an unlucky designer, and it is possible that he is really a talent, he just does not suspect it himself. idea creative work without fail, it is necessary to bear for a long time - until all the details of its implementation seem obvious, and the idea itself becomes a familiar and integral part of the future implementer.

Remember that masterpieces are created only when the creator has a clear idea of both the work process and the final result.
Methods for making paintings
Once upon a time, paintings meant mainly painting, but if we are talking about a design element for a wall, then there will be much more options. There will be no usual paints applied to paper here - everyone can guess to draw a picture and insert it into a frame. We will try to analyze only those solutions that look fresh, and at the same time they can be made by hand.

Finished fabric paintings
This method does not involve any fine art at all, except, perhaps, the correct compilation. The picture does not have to contain a clear plot and meaning - you can make a chic abstraction by simply hanging three pieces of fabric of the same shape and size stretched over the base, which would properly harmonize with each other.

If the fabric already contains some images, then this can be used additionally to create some kind of meaningful composition. Making these with your own hands is not at all difficult, here it will be harder to choose a good combination in such a way that it leaves a lasting pleasant impression. You can depart from the triptych proposed above - individual fragments of fabric may have irregular shapes, intertwine or be combined in any other way.
 main feature in creating paintings from fabric is the ability to choose the right combination, in accordance with the rules for combining colors
 Embroidery
This method is fully consistent with the wisdom that everything new is just a well-forgotten old. In the old days, women decorated their homes in this way, but today this tradition has been largely abandoned - and in vain: with proper execution, embroidery looks very attractive. Of course, only a real needlewoman can do such work with her own hands, but literally any plot can be portrayed. If the author also dreams of getting married, then her work, hanging on the wall in a frame, will tell a lot about potential candidates for husbands invited to visit.
Paintings in 3D
And who came up with the idea that the wall should be flat? We propose to make a real out of it with our own hands. volumetric image, whose features are conveyed not only by colors, but also by bulges and depressions!

Such work will be more difficult, more time and effort will be spent on its implementation, but the result will definitely be unusual! And you will need to do the following:
- On the wall that you plan to decorate in an original way, draw the outlines of the intended pattern with thin pencil lines. It is advisable to immediately evaluate the sketch from different angles of view and from different distances, show it to several people for an objective assessment and immediately correct it if there is constructive criticism.
- In an oilcloth bag, collect a sufficient amount of putty and tie a container by making a small hole in it. With an impromptu putty gun, circle the outlines of the drawing so that the drawn lines become convex, thanks to the added layer.
- Wait for the material to dry and harden, and then use a small knife to carefully trim the volume contour. If the drawing is complex enough, you can highlight both the contours and the internal details with irregularities.
- Since the resulting surface will not only be convex, but also very rough, use sandpaper to achieve smoothness. Do not choose the coarse-grained option - it will only damage the results. creative work. It is best to give preference to the smallest grains used for final grinding.
- Mix gouache with liquid PVA glue - so it will be much more resistant and durable. Use a brush to color the image as you intended at the planning stage.
- To complete the picture, its borders can be marked with special baguettes, which in this case will play the role of a frame.
colored paper
Such a solution threatens to be short-lived, but it is easy to do it yourself and then periodically renew it, introducing additional elements. The idea is extremely simple - silhouettes are cut out of colored paper according to the template, for example, butterflies, which in free order glued to the wall using ordinary PVA, or simply pinned. Cut out figures can be additionally decorated with intricate patterns. Ideally, the figurines should differ in shape and size, and maybe even in color. It is best to combine opposite shades, for example, black with white or red with blue.

For the wall near the stairs, figurines imitating a kitten captured in various playful poses on different steps are perfect.
Twine as a tool in the hands of the artist
Striking but do beautiful jewelry for the interior, you can even use an ordinary rope! Only a gifted person can make such a picture with his own hands - artistic vision and great patience are needed here in order to fix the rope in a vertical position in the required form. You can set the shape in any way - both with hot glue and with hidden thread fasteners. The resulting product is attached to the wall either with the same glue or with hidden studs.
 Twine paintings look unusual and stylish, so this wall decor option definitely deserves attention.
 Three-dimensional paintings with appliqué elements
You can make a picture with your own hands, which will combine both painting and applicative creativity. For this you need:

The value of this product will be all the higher because, despite the availability and prevalence of all the materials used, not so many people can create such a masterpiece, simple in its genius, with their own hands.
Option for the laziest
In the end, there is a way to create a wall picture that does not require any talent, or any skills, or even effort at all. All you need is to find the desired image on the Internet in good resolution and print it out on a printer. Next, the resulting printout is inserted into a frame purchased in advance in the store and voila - cheap and cheerful!
It is believed that painting a picture with your own hands means not just getting a stylish addition in the form unusual element decor, but also reflect, thus, the individuality of the interior and its own vision of space. If you have always had an excellent score in drawing, or if you have an art school behind you, creating a canvas will not be difficult. Things will get up for small things, you just need to grab inspiration by the tail. But if you are from the category of beginners in fine arts then our advice will come in handy. This publication will discuss how to draw a picture without professional skills.
Landscape creation
The style of painting that we offer at the very beginning is more suitable for expressive natures. Arm yourself with canvas, paints and buckets. You don't need brushes. It is better if you begin to create your masterpiece on open space so as not to stain the walls and floor with paint.
Throw out your emotions and desires on the canvas, take as many shades as you see fit, and give preference to bright colors. You can even layer applications one on top of the other. As you can see, there are not only paintings drawn in pencil and watercolor. In our case, this is one continuous expressionism, which is able to give the amateur artist both a unique experience and a stunning canvas of its kind.

Abstractionism
Since the 20th century, among the recognized masters of painting, abstractionists have always been in the forefront. Looking at their masterpieces, which are now estimated at fabulous sums, a common person may exclaim: “My little daughter draws just as well!”. And all because there are no principles. Therefore, if you do not know how to draw a picture, apply a genre called abstract art to create a canvas. What should be guided by when creating a masterpiece?
First of all, stock up on acrylics in your favorite color scheme. If there is a color in nature that you can admire endlessly, be sure to take it into service. Then complement the color spectrum with softer and darker shades. Now it remains to stock up on canvas, brushes of different thicknesses, a watercolor palette and water. Let's take into account that water in our process will play by no means the last role.

stroke technique
First, mentally break the canvas into several parts. Start applying strokes from left to right, first using the darkest shade presented in the palette. It turns out amazing in its beauty color stretching. remember, that acrylic paints- the most fertile material for an inexperienced painter.
You always have the opportunity to correct not quite successful pieces of the picture on canvas using a higher paint consistency or dilution with water. Plus, acrylic paint dries easily, so you don't have to rush. On average, it may take no more than an hour to create a masterpiece. Now you know what picture to draw, it remains to complete the design of the canvas with a beautiful frame.
Canvas frames
By the way, if you see that your canvas is self-sufficient, you can place it on place of honor on the wall even without a frame. Now any manifestations of non-standard approaches to design are relevant. Let's give one such example. But what if you put a frame on the wall separately without a picture? It turns out that you decorate the interior with a picture that does not exist!

Decorate the frame with flowers, bows, any materials at hand. What will be the decoration of the frame, the more spectacular it will look on the wall. Don't know how to draw a picture? You won't need it. Using this technique, you can decorate an entire wall, you just need to pick up a dozen frames different sizes and forms.
geometric patterns
For this technique, in addition to paints and canvas, you will need a regular masking tape, a pencil and a foam rubber sponge. First, create in your imagination some geometric composition, for example, a herringbone pattern adopted from a parquet board. Now arm yourself with a pencil and sketch out the places on the canvas that should remain white when finished. Cover these areas with masking tape. In this way, you will get perfectly even edges of the patterns, and you will not need to waste time outlining with a ruler. Apply the foundation of the tone to the unglued places with paint.
Now your task is to complement your masterpiece with spectacular stains. Take a sponge and dip it in any paint you want to see on the canvas. Work with a still wet base on canvas to make the streak marks look as natural as possible. Once completely dry, remove the masking tape. That's all, now you know what picture to draw, even if you are not good at painting.

Photo printing
If you want concise, strict and correct silhouettes in your own picture, you can turn to professionals for help. Printing workshops provide their services to the public and depict a high-quality print on any surface. Photo retouching technology will create the illusion of a picture applied with black paint. Choose any image you like and transfer it to your wall in the form of an original painting.
Just do not get carried away with images of strangers staring at you from the canvas, otherwise it will turn out like in known history"Bill painted this picture." According to rumors, the boy depicted in the picture made all the owners of the canvas experience many terrible moments, so much so that they had to get rid of the mysterious canvas. So the picture wandered from owner to owner all the time. Based on this legend, more than one horror film has been created.
That's why the best images for a canvas with photo printing, animals, plants, natural phenomena, as well as the most famous world attractions can act.
Conclusion
If you have a burning desire to create a unique and stylish decor in your interior with the help of exclusive paintings, draw them yourself. So you will more fully reflect your own idea of the world, acquire a new hobby, show your imagination and gain invaluable experience. Be sure that no other home will have such masterpieces, because you created them with my own hands.
Making interior paintings with your own hands is very exciting. In this case, the most accessible materials are used, such as: buttons, paper, lemon, feathers, balloon, packaging from cupcakes.
DIY interior paintings
Feather painting
Feel real contemporary artists creating an amazing canvas. It will be light and airy, as it is created from feathers.

Here is what you will need to make such interior paintings:
- feathers;
- paint in cans;
- frame;
- big bead;
- glue;
- sheet of cardboard.

Then, on another surface, you need to paint the feathers using spray paint.

As you can see, shades of the same color look great. Therefore, you can take dark and light blue paint. Glue the feathers first outside the circle, and then make the rows closer to the center.

When this entire surface is filled, glue a large bead in the middle.

After the glue dries, you can frame finished work and hang it in the bedroom or in the living room or present it to a dear person as a souvenir.

This picture in the interior looks great, like the following.
paper painting
Soaring butterflies will certainly cheer you up.

To create such beauty, you do not need a lot of materials. You will only need:
- colored paper pink and white shades;
- a sheet of foam or expanded polystyrene;
- glue;
- whatman;
- scissors.

- Cut strips of the desired width from pink colored paper. The distance between the sides should be what you want to see the wingspan of this insect.
- Attach the butterfly to the beginning of the paper strip, fold the tape several times so that the insect has enough space on the square allotted to it. Outline the butterfly and cut along the contours. You will get not one, but several insects at once.
- In the same way, folding the paper sheets into a stack of squares, cut out the rest of the butterflies. Use dark pink, pink and light pink paper for this.
- With the help of double-sided tape, it is necessary to glue a sheet of polystyrene foam or polystyrene foam with whatman paper. Draw the outline of the future figure on it using a washable marker or chalk. Start gluing butterflies, filling this figure with them. When the work is completed, you can use it for its intended purpose.
Also, as in the photo shown, make the left outline of the drawing fuzzy, as if these are soaring butterflies that are gradually landing here.
Such works look especially beautiful when sunshine. You can not glue the foam, but tint it using a sponge and paint. Then glue the butterflies using double-sided tape.

You can create interior paintings by making cardboard frames with your own hands. And so that butterflies are visible on the canvas, draw their outlines on a sheet of cardboard and cut them out with a clerical knife. But the bottom of the base should be a more contrasting color so that the butterflies can be clearly seen.

You can leave them as white or paint them.
get busy with it interesting creativity with kids. After all, they too can create with you original paintings. Each butterfly can be painted and glued to the canvas.

To make a wall panel, use heart-shaped figurines. For the following work, you don’t even need a frame, but you only need:
- double-sided cardboard;
- scissors;
- fishing line;
- bar;
- dye;
- awl.
You should have several rows of hearts. Paint the block and tie the top pieces of the lines to it.
Now you can hang such a beautiful panel above the bed in the bedroom or on the wall in another room.

The creative impulse should not be held back by the absence of some material, such as paper. If you don't have it, use read newspapers. Cut out hearts from them and glue them to the paper base, make a frame for work.

If you still have ceiling tiles, this material will make wonderful interior paintings.

For these, you will need the remnants of colored paper. By adopting the template presented above or creating your own, you will make such a cheerful panel.
Pictures from buttons and corks
The following design decisions will be prompted by waste material. After all, wine corks are usually thrown away, and a lot of interesting things can be made from them. Here is a work created on the basis of this material.

For the first picture, you need to cut each cork in half, and if you have a lot of such material, then use whole elements. On the base, first apply the contour of the future masterpiece, and then fill it with blanks. If you want the picture to take on a rainbow tone, then pre-paint them.
To get such beautiful interior paintings, you can only use:
- bottle caps;
- rope;
- awl.
The next picture does not need a frame. You simply glue rows of corks on the main surface and you can attach a postcard here to congratulate your loved one.
If you have accumulated a lot of unnecessary buttons in your household, then you can also make interior paintings from them.

For the next one, they will use:
- buttons in shades of green and brown;
- glue;
- wooden board;
- pencil.
The following will also decorate the interior.

You can lay out the first letter of the name of a loved one with buttons, stick them on the base and hand the masterpiece to him. The motive can be very different. Make the outlines of an animal or an anchor out of buttons, such works will also certainly be appreciated.
You can confess your love in the most unexpected way. Paint the wood surface, when dry, stick here pink buttons in the form of a heart. Seeing such a sign of attention, your dear person will certainly be delighted.

Paintings in the interior can be very different. If you want to capture dark time days, then pre-paint the background brown paint. It doesn't have to be straight. Spread the paint with a sponge, then it will turn out so mysterious.

A black marker will help to highlight the contours of the branches and trunk, and a rainbow crown can be made from buttons of various colors.
If you prefer light colors when taking white base, draw a trunk here with a marker or brown pencil. You can give your creative imagination will and lay out this part of the tree using threads of this color. Glue the buttons, which will turn into multi-colored leaves.

Nature itself will help to draw interior pictures. Check out the following interesting ways their creations.
Method for printing interior paintings
It is enough to dip a chamomile or other flower into the paint, and it will make a wonderful printing tool. You will lean the plant against a white sheet of paper and create original drawings.

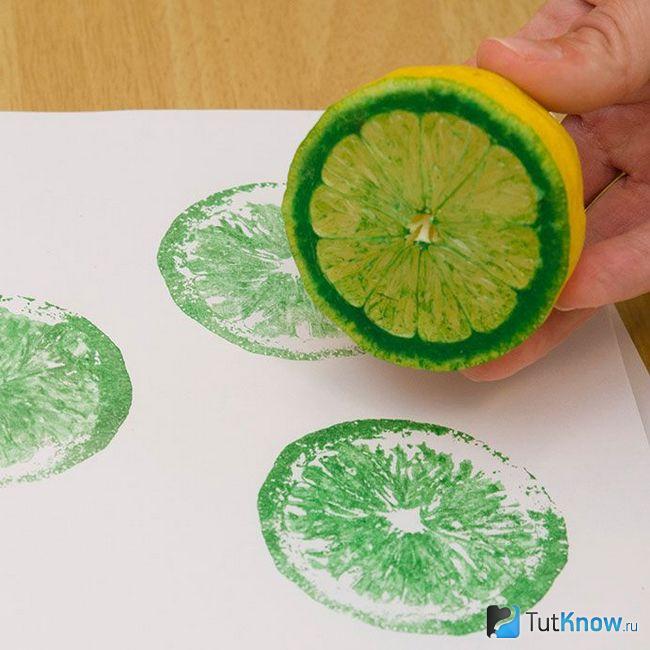
Lemon can be used not only for its intended purpose. Dip half of this fruit in paint and print on paper.
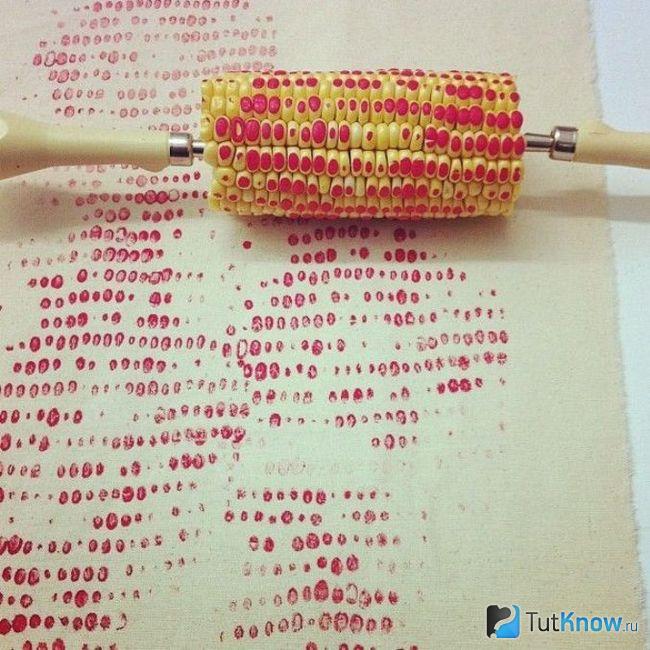
Such artistic therapy will certainly cheer you up. You can use a wide variety of fruits and vegetables to create interior paintings. If you have an ear of corn, then cut off a fragment of the desired length from it, prick it on both sides on forks or other sharp objects and print to your health.
If fruits and vegetables are not available or you do not want to use them to create paintings, then you can take a balloon.
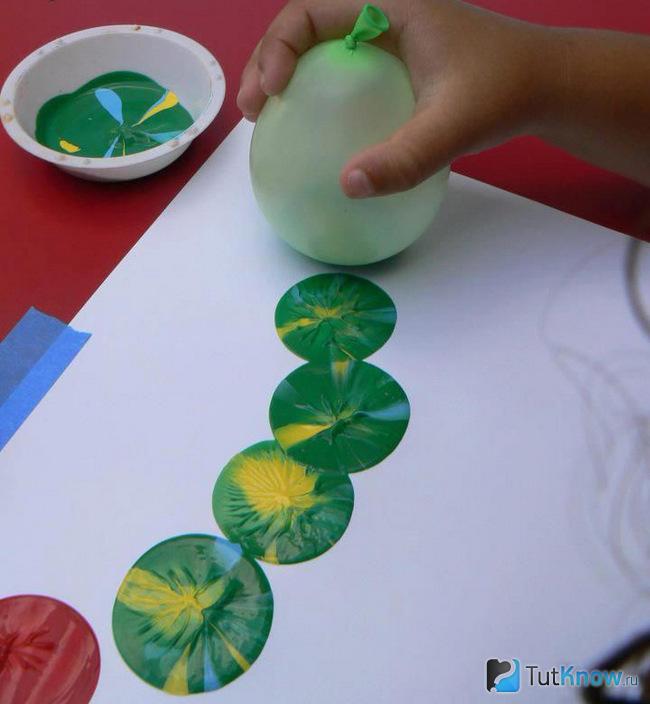
Pour paint into a bowl. And if you want the prints to be more interesting, then add paint and other shades here. Dip the ball into this mass, then lift it up and print patterns on a piece of paper that you yourself will come up with.
If you want to draw your loved one Teddy bear, but you can't, then you can make an impression. In order not to spoil the toy, take water-washable paint. Dip the bear here and attach it to a sheet of contrasting paper.

If there are no such consumables, then you can even use your own palm. Dip it in a bowl of paint and lean it against the paper base.
If you want to make a picture for memory, then invite all family members to do similar manipulations. In this case, the largest palm should be printed first, and then the next ones are arranged in decreasing order. Use paint different colors so that each print is clearly visible.

It remains to see a few more ways that will allow you to create interior paintings. To make such masterpieces, you will need very little time.
Interior paintings on the wall in 15 minutes - master class
That is how long it will take to create the next masterpiece.
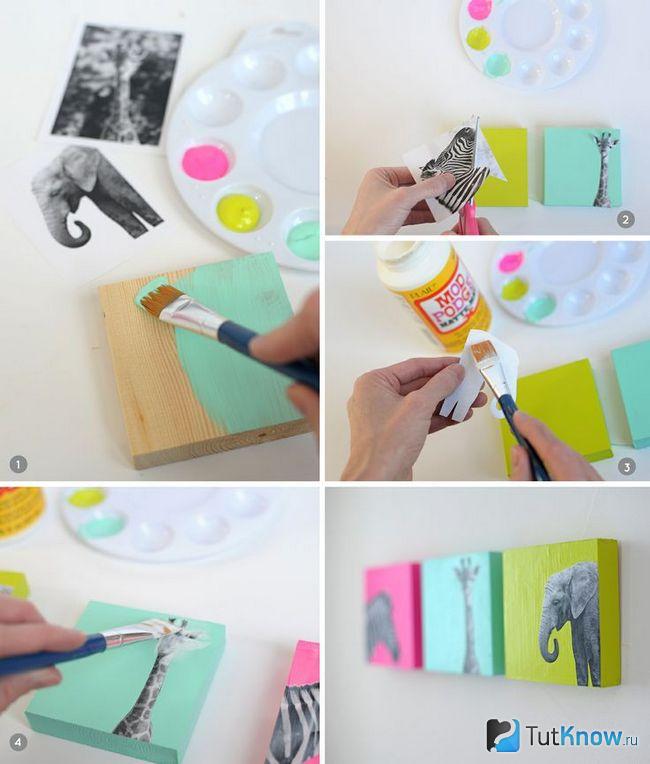
Also for the interior painting you will need:
- boards;
- dye;
- brush;
- glue;
- Pictures.
You will create the next canvas as quickly. Such works will appeal to lovers of glamour.
Step-by-step master class, detailed photos will help you quickly understand interesting idea. First you need to prepare:
- simple pencil;
- scotch;
- glue;
- sequins.
If you don't have glitter, then you can grind up a broken Christmas ball. To do this, it is covered with a cloth and gently knocked on top with a hammer.
Remove the tape after the glue has dried. Where there was adhesive tape, you need to go through the paint using a brush. After a while, the work can be glued to the wall using double-sided tape.
If you liked these interior paintings, then create the next one almost in the same way.
For this you will need to take:
- picture;
- self-adhesive letters;
- white acrylic paint.
If you have even less time, then you can make a panel in the same minimalist traditions as Malevich's black square.

To do this, a white sheet of cardboard must be covered with black paint using a coarse brush. It remains to hang your masterpiece on the wall and wait for the approving responses of home and visiting guests.
Even the remnants of the fabric will give interesting ideas.

Wrap rectangles and squares previously cut out of cardboard with such flaps. Fold the fabric over reverse side and pin here. Make a loop, hang your masterpiece with it or double-sided tape. You can create interior paintings so that you get a whole exhibition or make one or two. It all depends on the amount of free time and the availability of material.
If you have small shreds left, then you can make such a voluminous flower.

According to the template, cut out the petals for it. Slightly bending the edge of each, glue to the prepared surface. It can be a sheet of foam or cardboard with interlining wrapped in fabric. First create the outer circle of the petals, then the next, staggering them. Moving towards the center, complete your work. In the middle, the petals are slightly smaller and look up.
If there is a braid left from the needlework, it can also be put into action. See what kind of paintings in the interior you can create with it.

To do this, you need to cut these tapes into strips. the same size and glue the end and the beginning of each. Then you need to pull the resulting circles to the center from 4 sides, and you will get four-petal flowers. You can also quickly make a panel from packages of cupcakes and cookies. Glue these paper molds to the prepared surface, see how delicate and airy the picture is.

By applying a leaf template to paper, you can cut such blanks of the same size quite quickly.

It remains to glue them next to the paper branches and frame the finished work.
Here are some interesting works art can be created in minutes from available material. If you want to see how others make interior paintings, then your desire will be fulfilled right now.
Indulge yourself in pleasure and see how you can make a picture, the surface of which will resemble marble:
We often decorate our interior with paintings, posters and photographs. In addition to being a common and effective wall decor, they also fill our living space with personality. Personal photographs are dear to us because of the memories and emotions they evoke and keep in our memory. Located in the interior one by one or in groups, they fix our attention on a certain section of the wall or the horizontal surface of a chest of drawers, shelves or cabinets.


Posters with images of nature, animals, cities, abstract compositions, as well as reproductions of paintings often play minor role in decorating space. They are often selected for an existing environment, in accordance with the prevailing style and color.


A picture, unlike a poster, can be a starting point in interior design, that is, set a style, color scheme and even the composition of the room. The position of the painting in the interior is determined depending on the plot of the painting, its size and design: the presence and size of the passe-partout and the shape of the frame.

Often the picture is accentuated artificial source Sveta. It can directly illuminate the canvas of the picture itself, located above it. Luminaires can also be built into the ceiling or placed behind a painting to provide contour lighting.


How to paint a picture yourself
It is known that many people sooner or later have a desire to create something: to make or draw. If you feel the urge to do so, go for it! For example, everyone can create a picture on their own, even if you did not study at art school or at special drawing courses. Do not doubt your abilities, maybe not the first time, but you will surely succeed interesting job that will delight you and give you confidence in your creativity. After all, nothing brings us creative satisfaction like the creative process and its results.

I, like many of you, for a long time nurtured the thought “whether to paint me a picture”, especially since I already had oil paints and a pre-prepared canvas (actually fiberboard). Finally, I found time for this. Next, I will tell you how you can draw a picture from a photo yourself.

First, decide on the plot. Personally, I chose one of the photos from my mother's garden: a tulip photographed from above. This angle seemed interesting to me and I decided to capture it. In addition, this photo is not very detailed, so it is not very difficult to copy it.

In general, paintings with flowers, in my opinion, are universal, they can decorate almost any room. That is, it is a win-win option for decorating living space. Here are some examples of flower paintings:


Keep in mind that you can paint with oil not only on canvas, but also on wood, plywood or cardboard. I had a small piece of fiberboard ( fibreboard), which I covered several times with a special white primer purchased from an art supply store. Brushes can be either natural or synthetic. Harder brushes are used for oil than for watercolor paints. Ideally, you need to have brushes of different sizes: a large brush for the background, a medium one for the main work, and a small thin one for drawing details.

AT Photoshop I cropped the tulip photo around the edges to fit the size of my hardboard (26 x 33 cm). In order not to redraw the image, I printed it on two sheets, since my fiberboard canvas was larger than the landscape sheet.

Then I traced the outlines of the tulip with a simple pencil, further, on the window, I outlined these contours on the other side of the paper, so that later I could transfer them to the surface of the fiberboard. In fact, if you have tracing paper, the job of transferring the image to the surface of the canvas will go much faster.


So, after I transferred the outlines of the image from the printed photo to my base, I started painting my painting. Up to this point, I had never tried to paint in oils, but I had some gouache skills from the days of art school, which I graduated from as a child. The texture of the oil is very similar to gouache - it has the same thick consistency. For dilution oil paints I used linseed oil. You will need a palette - a piece of cardboard, plywood or wood. Squeeze out the paints on the palette, if necessary, mix them and only then transfer them to the canvas.

I didn’t have an easel, I organized myself workplace laying newspapers on the table. I held my canvas at an angle - that is, so that it was maximally deployed to my gaze. I opened the original photo to the full screen of my laptop and, periodically looking at it, began to draw. I painted my picture on the principle of a developing photograph, first filling in the brightest and darkest parts of the image, then the lighter ones, and so on. To determine the dark and light areas - periodically squint your eyes, looking at the original image. Keep in mind that white canvas cannot be left. Even if your image has White color, as I did, these white areas need to be covered with white paint. When you drastically change the color of the paint you are working with, for example, you painted greens using blue-green shades, and now you move on to painting the colors themselves in yellow-red, use a thick napkin or piece of cloth to wipe the brush.

Painting the picture, including transferring the image to the base, took me no more than one day. So I did it all in one sitting. After completing the painting, let it dry. How long your work will dry will depend on the thickness of the oil layer, paints, thinner, room temperature and humidity. In general, this takes about a week. After working with paints, dry the brushes thoroughly with a solvent rag, then rinse them.


When you make sure that the picture has dried, you can think about how to arrange it. If the picture is made on a stretcher covered with canvas, its ends can also be painted over with paint and placed directly on the wall without a frame. In my case, I used fiberboard - in this case, in order for the picture to look better, it is better to frame it with a baguette. Ready-made frames can be found in stores such as IKEA. A custom-made frame will cost significantly more. In addition, a mat can be included in the design of the picture - a solid field between the picture and the frame. Passepartout makes the picture more elegant and visually enlarges it. I made a photo montage to show how the painting can be framed.

Do not be discouraged if your first pancake turns out to be lumpy and your first picture does not really satisfy you. Drawing is a skill and this skill can be developed. The more you draw, the better you will get. Perhaps one day you will paint a series of paintings and decorate your living space with it. Having in your home a unique image in a single copy, made with your own hands, is a great pleasure. Having made such a picture as a gift to your loved ones, it will sincerely please them. creative success to you!
People began to draw beautiful pictures at the dawn of mankind. And if in ancient times, drawing pictures was a way to convey some messages to other people, then later their purpose changed. Gradually, pictures began to be painted for pleasure and they began to decorate their homes. Art such as painting arose, which spread everywhere and became popular. The method of decorating the room with the help of paintings has survived to this day.
Everyone knows that beautiful images can transform a room, make it cozier and more attractive. Of course, in our age there are many design solutions, but none of them can be compared with beautiful picture which you can also make yourself. It is not charming to have talent to create a great image, just one desire and time is enough to realize your idea.
Looking for inspiration
Do not take the first project that comes across and try to do it quickly. You risk getting unprofessional and sloppy work. This is the mistake of many. Give yourself time to think, consider a variety of ideas and photos. Decide what kind of picture you would like to see on your walls, let all the details gradually add up into a single whole. Select only best ideas.
The whole process of work and the end result should seem clear to you, then you can create a masterpiece. Worth a try in different genres, but it is better to start with the most affordable. If you have sewing skills, then try to make a picture out of fabric. And if you have embroidery skills, then embroider something original. Having made one creation, you will want more.

There are many ways to create a picture on your own - from the usual way to us using a piece of paper and paints to creating three-dimensional compositions using improvised material. Consider the most interesting design solutions that will help you create paintings with your own hands and master classes.

fabric paintings
Take beautiful fabrics and make attractive interesting interior items out of them. Moreover, you can take both fabrics with an already drawn plot, and with an abstract pattern. From several of these drawings, you can make an attractive composition. The main thing here is to combine images in such a way that they create a pleasant impression.
Finally, you can simply embroider a picture and get a great decoration. But first, of course, you will need to get at least some needlework skills. With proper execution, such a picture can become a highlight that will add attractiveness to your home.

A picture for the interior made of various scarves looks no less attractive, especially this option is suitable for country style or Provence.
3D paintings
Using improvised materials, you can create three-dimensional paintings that will decorate the walls of your home. Absolutely any thing can be used: dried flowers, colored paper, twine, corks from wine bottles, pieces of fabric, leather, the imagination is limitless. Consider the simplest options.

Using colored paper
From colored paper, you can cut out absolutely any figures. You can even use a template for this. Cut out beautiful flowers, butterflies, birds and stick them on the base - on canvas or a thick sheet of cardboard. Don't forget to compose a beautiful composition. You can stick the figures on the canvas using ordinary PVA glue. Thus, you will get an attractive paper picture, moreover, its creation will not require any special skills from you.
Even simple wallpapers can be used. Surely, you will find trimmings of a variety of wallpapers, from which you can add up the most different drawings. Use your imagination, it is possible that you will be able to recreate a fairy-tale castle or a hut on chicken legs using your material. Use clippings with different types wallpaper and you get a bright, colorful image.
Attach your creation to a thick sheet of cardboard, frame it, hang it on the wall and enjoy the view. If the picture is intended for a kitchen room, then you can insert a wallpaper pattern into a candy box. Of course, consider the color of the walls and the decor in the room, your creation should be combined and match the general background.

If you want to draw attention to your creation, then hang it on a plain wall, in the very center. Everyone will immediately pay attention to the beauty of the picture.
Twine
Anyone who has excellent artistic vision can create a picture from a simple twine. To do this, the twine first needs to sell a certain shape. You can fix the shape with hot glue. Then several strings are stacked on the wall in a certain order, creating an artistic picture.

Leather - master class
The picture on the wall made of leather looks original. But you can start creating this picture of flowers only if you have already gained enough experience in creating three-dimensional paintings. We present you a master class that will help you create such a miracle for yourself at home.
First, prepare the frame and the base, which will then be inserted into the frame. You will need leather material. Given that such material is quite expensive, you can take an old leather coat and cut it into pieces. Do not forget to prepare acrylic paints, scissors, a knife, a stapler, glue, paper sheet, crayon.
Consider a step by step description:
- Do paper templates leaves, petals, cut them out.

- Cut out the details of the future picture from the skin according to a pre-made template. You can hold the skin a little above the fire, which will make it appearance more attractive.

- Paint the details with acrylic paints in the colors you want.

- Insert the base into the frame. It can be a simple fabric sheet that you will need to stretch or take a simple sheet of plywood.

- Lay out the previously made leather details on the base and evaluate how it will look. You can overlay other details to improve the composition. Use dried flowers, shells, twigs, and other materials.

- Glue all the details with glue.
- Hang the picture on the wall.

Thus, you can create any kind of leather paintings, which only your imagination is capable of.
Modular pictures
The most popular in interior design today are Modular pictures. Their brightness is amazing, they personify good taste and sophistication. In addition, they make any room attractive and hide its flaws. These paintings have one idea, but all their elements are corroded.
If desired, such modular paintings with your own hands can be made at home. The size and shape of modular paintings varies, so you need to choose one that matches your room. The modular picture should have 3 parts, but maybe less or more.

Before you start, you need to determine what will be depicted in the picture. Realistic landscapes look good and interesting places big city. You should not divide a human portrait into modules, it will not look attractive.
To create a modular painting, you don't have to paint it yourself. You will only need to select any image from the Internet and print it on a printer. Then you just cut it into several pieces and hang it on the wall in such a fragmented form. For aesthetics, you can transfer the summer image to canvas or a sheet of cardboard.
Fragments of the picture can be placed each in a separate frame and hung on the wall. The basis for the models can be made of wood, chipboard, foam and other materials. Modular paintings can be made on fabric and made up of a variety of shreds.

Modular paintings look best on large spaces, concrete walls. Canvases of different sizes, as well as asymmetric parts, look original. It is better to cover the surface of the painting with a protective varnish to protect it from dust and rapid abrasion.
Painting Ideas
It can be quite difficult for many to decide what kind of picture to paint, how to arrange materials. In this case, you can consider the following best ideas and photos.
Blue abstraction. Take the following items: blue tulle or ribbons, scissors, cardboard or canvas, glue. Cut a few pieces of blue tulle or ribbons, arrange them abstract painting. Stick with glue on the base. Work carefully so that the glue does not smudge your drawing. You can then frame your creation and hang it on the wall.

Gold autumn. To make such a picture, you will need the following things: a base in the form of a piece of cardboard or plywood, plain fabric, acrylic paints, a brush, glue, a tree branch, golden spray paint.
Take the fabric and cover it with fabric. The fabric can be additionally painted over with plain paint, it is better to take blue. Prepare the branch. To make it easier to lay down on the drawing, it is better to put something flat and heavy on it and hold it for a while. Then you will need to glue the twig to the canvas and spray gold spray paint over the entire drawing. Wait until your composition is completely dry and you can hang it on the wall.

Fabric butterflies. Cut out beautiful butterflies from fabric and stick them on the wall with PVA glue. Such decorations will enliven any plain boring wall.
You can lay out a beautiful composition from ordinary buttons different color. Glue them on the canvas, insert them into the frame and decorate the wall of your house.
For the kitchen, a picture made up of coffee beans is perfect. From this material, you can make quite original drawings. First you need to prepare a base from an acron sheet and canvas, apply some pattern to it, and then lay out this pattern with coffee beans. In order for the coffee beans to be firmly attached to the pattern, it is better to use a glue gun. Along with coffee beans, you can use other materials such as shells, pasta and other scrap materials.

Pictures can even be made from old newspapers. This option is great for retro style.
Make a lot of small pieces of paper painted in the color of fish scales and make an original picture out of them.
Dried flowers are an excellent material for creating paintings. The main thing is to prepare a lot of material, but even if you did not have time to prepare it in the summer, you can use the flowers that grow in your home. To create DIY flower paintings, you only need a canvas, a frame, double glass, but of course, dried flowers.
Use your imagination and any material at hand to create paintings. You can always create a masterpiece worthy of admiration that will decorate the walls of your home and make it more comfortable.


